Roland Juno Di Service Manual Work 🎯
Roland Juno Di Service Manual Work 🎯
The Perfect Music Player for Android with over 50 Million downloads in Google Play Store
The Perfect Music Player for Android with over 50 Million downloads in Google Play Store
Performing service work on a digital synthesizer carries risks for both you and the instrument.
Accessing the underlying electronic components requires a complete teardown of the lower casing. Follow these chronological steps to prevent physical chassis stress or torn traces:
-inch audio outputs, headphone jack, microphone input, MIDI ports, and the DC power input jack.
If you are looking for specific "work" or repairs, users frequently encounter these issues:
Desolder the faulty 4-pin tactile switch using desoldering braid or a solder sucker. Replace it with an original Roland specification switch (or equivalent footprint, typically 6x6mm micro-switches). Clean the area with 99% Isopropyl Alcohol (IPA) afterward. Key Contact Cleaning and Replacement roland juno di service manual work
Official service manuals for the are typically reserved for authorized service centers, but you can find documentation and repair guidance through the following reputable sources: Service & Technical Manuals SynthXL : Provides a downloadable Service Manual
Before opening the chassis, you must prepare a safe workspace to prevent personal injury or damage to the synthesizer's sensitive Complementary Metal-Oxide-Semiconductor (CMOS) components.
The Roland Juno Di service manual is an essential resource for:
To help you get started on troubleshooting or repairing your synth, tell me a bit more about the problem: Performing service work on a digital synthesizer carries
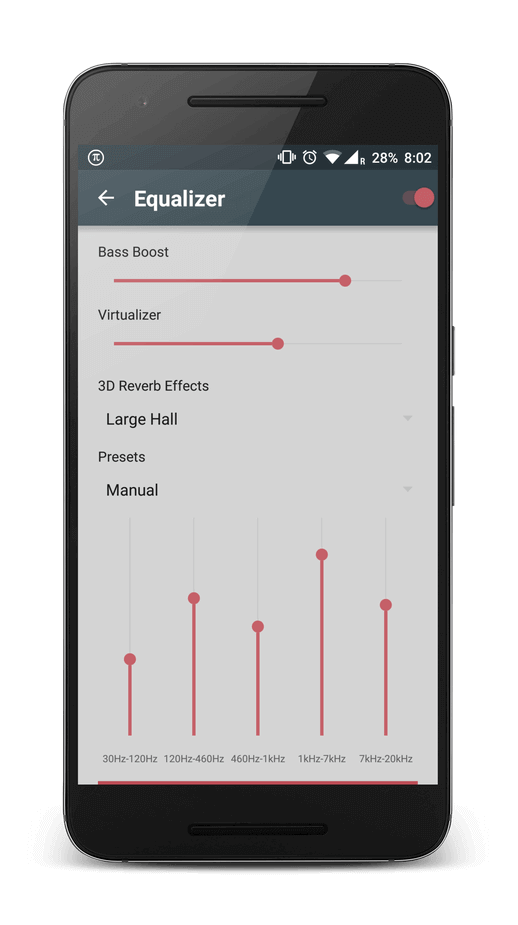
Working on digital synthesizers requires a different approach than analog gear or guitars. This guide breaks down the manual into actionable workflows.
If certain keys do not play, or if they instantly play at maximum volume (127 velocity) regardless of how softly you press them, dirt or dust has compromised the key contact matrix.
Lift the rubber strips gently. Inspect the black conductive carbon dots on the underside of the rubber and the interlocking gold-plated PCB traces below them.
The is not just about fixing a broken synth—it is about understanding the engineering behind a modern digital instrument. With the manual in hand, a steady screwdriver, and a patient mindset, you can resurrect a Juno-Di that would otherwise become e-waste. If you are looking for specific "work" or
This paper explores the practical and intellectual labor of working with this manual, focusing on three key areas: mechanical disassembly, power supply debugging, and keybed restoration.
By combining the Roland Juno Di service manual with these additional resources, you'll be well on your way to becoming a Juno Di expert and getting the most out of your instrument.
The official Roland Juno-Di service manual is a highly technical document intended for authorized service centers. It contains critical data blocks necessary for advanced troubleshooting: The Block Diagram